
Dungeon Defenders Bonus: Glitterhelm Caverns (level 13) guide


Strategy breakdown
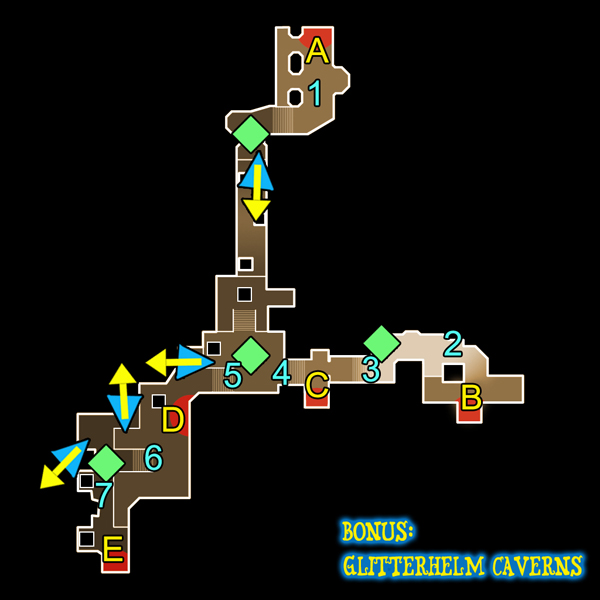
This level is absolutely bonkers considering how large it is and the fact that there are four crystals and ten million choke points. Okay, maybe not that many. However, there are a lot. The key to Glitterhelm is the ogres, however, as several start spawning in the later half of the level but the location is randomized. Sometimes two can show up from one area and when that happens… well let’s just say it’s easy to lose if that happens. One person will need to hang out in the north, preferably the person with the lowest Hero stats, but everyone else (playing this solo will be super difficult) should be scampering about the South attempting to save it.
Before doing anything, run to each and every chokepoint and place blockades. 1 needs three of any type, 2 – 6 need two bouncers and 7 needs on in front of the bridge. The bouncers at 4 should be placed mid-way through the stairs, if they’re too low archers will be able to snipe the tower, too high and the ogres can hit them while invincible. Once that’s done, proceed to dealing with each choke point.
First up, the North. 1 is the chokiest of choke points, and should be managed quite easily. Spike or magic blockades here wide enough to hold off the enemy forces supplemented with ample tower and aura support. No matter what auras or traps go up, a strength drain aura will be necessary here. Lightning and fire towers or bowling and harpoon towers, which ever people want to use will work just fine. Below the crystal will require some anti-air, so put up a fireball tower and electric aura combo, or an ensnare and harpoon combo.
The South, which is 2 – 7, is a very scary bit of defending. 2 might get ogres but other than that not too much, so just put a bowler and a trap or two (inferno/proximity and a gas trap) there. 3 just needs a bowler. 4 will need traps, the full inferno gas and proximity combo (on the C side, not the crystal side). 5 Will need auras including ensnare and electric. A strength drain should be placed as ogres are likely to spawn there, but it can be done as needed. 6 is simple and just need bouncers. 7 needs a bouncer and an inferno gas trap combo. Complicated, a bit, but it’ll all work in symphony.
The last bit of setup (which should be accomplished by the second wave) involves the anti-air for the south. The map looks a little crazy, but that’s for harpoons. Perhaps an easier way would be to do a lightning and fireball combo, placing a lightning tower close to the southern crystal (on the eastern side of it as close as possible) and fireball towers at the top of the staircase leading from 6; the bottom one should face West, the top one should face North West. This should be enough to defend this area from wyverns, but watch the skies to see what’s working and what’s not. Harpoons can work in the same situation, but they’ll need to fire quickly. Lastly, Deadly Strikers will work here in the exact same positions (sans the lightning tower) but they must be backed by a high attack speed.
Finally, what should the heroes be doing. Running around like crazy, for one. Watch for ogres, when the ogre alert shows up, check the map immediately because they don’t come from the same place every time. If there are ever two ogres in one place, they must be dealt with immediately, as they will steamroll just about anything. The best and first step to fighting off two ogres is the strength drain, so if you’re the monk, pay attention. So much attention your eyeballs explode. There will be much to repair and much to upgrade, but as a rule of thumb, upgrade blockades first because of how much punishment everything will take on this level.
Good luck, you will need it.
Tips & tricks
- Get the North setup quickly so only one person has to be up there at a time.
- Be generous with DUs when it comes to solving the anti-air problem near 7 as there are a lot of wyverns on this level and most of them go there.
- Always be on the lookout for ogres as there are many, sometimes two at once in the same place.
- Monks are your best friends here and are most effective with high hero and defense boost stats.
Video Guide
Special loot:
- Apprentice – Incandescant
- Squire – Ytterbium Laser
- Huntress – Flame Buffet
- Monk – Firegrass Scythe