Trenched Pacific Powerplant map guide
Featured in this guide
Jacobs, Mortar Emplacements
Double Fine’s quick tips
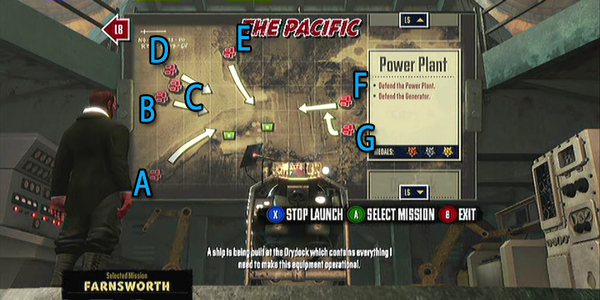
Map layout
- Defend the Power Plant
- Defend the Generator
Recommended Trench loadout
- Area Effect Weapons
XBLAFans gold medal advice
XBLAFans recommended loadout
- Honeychurch Chassis
- Machine Guns (1 flak recommended)
- Mortary and Machine Gun Turrets, Dampener Emplacement
Getting gold:
Power Plant is another really fun map, but unlike Port it’s pretty tough if you’re not on top of things. The goal here is to keep the average of both objectives above 80%, which means if the Power Plant goes to 75% but the Generator maintains 90%, you’ll still pass, so don’t freak out if you’re a little under 80% on either objective. F and G can easily be managed with a set of emplacements placed on the second row from the front in this order from right (the apex of the turn) to left, as close as possible to each other: Dampener, Machine Gun, Mortar, Dampener.
For early setup, put the first two emplacements in that list (Dampener/Machine Gun) and then put a machine gun in front of the base on the neat little square between the objective and F. The key in the early waves is to watch for the back, so after you’ve got the initial setup put a machine gun on each side of the wall directly next to the Power Planet (where A – E filter through) with a dampener to seal the deal. Unfortunately, however, the machine guns will be too silly to shoot the Jacobs before the Resistors, so be sure to take them out. It’s a good idea in general to hang out near the back and take care of rear-attacks and aerials.
Switch
Switching to the Generator (A – E conduits) requires some quick MG turret placements. You’ll want one on each side of the Generator (the E resistors follow a strange path where they go straight into the wall, then towards the Generator, so put MG Turrets close to the base) and one in the center. The center one needs to be upgraded, if you have the extra scrap put down a mortar to help with Jacobs. The real issue during these few waves will be Blitzers, as there are many. Upgrading your A and E dampeners gives you time to deal with aerials or stop blitzers from blowing you up. It’s important not to die here as Blitzers will attack the Generator if you’re down and do some serious damage. With your MG turrets setup, dampeners protecting and mortar assisting, you should be fine after upgrading the dampeners and the center MG turret. Don’t spend more scrap than is necessary.
Switch
Back to the front for the home stretch, you’ll be seeing a lot of aerials. Upgrade the mortar, make sure your base-defense MG (the one between the base and F) is full upgraded then build another one. If you have the scrap, put up a mortar to deal with the back-door blitzers while they’re caught in the dampener you should’ve placed in the way beginning of the game. The four-emplacement list also established earlier in this guide should be complete and provided the dampeners are upgraded the entire F conduit should be managed 100% autonomously. Stay near the base, watch for blitzers, take our aerials, and don’t let the Big Willies on the final wave get too far with Jacobs protection.
Wave breakdown
Wave 1: F Resistors
Wave 2: E Aerials
Wave 3: F Jacob with Resistors x2
Wave 4: D Resistors E Aerials
Wave 5: F Resistors with Jacob x2, F Blitzers, Burst Transmitter
Wave 6: F Breakers, E Aerials, D Jacobs with Resistors,
Wave 7: F Jacob with Burst Transmitters followed by Blitzers, then F Jacob with Resistors
Wave 8: E Aerials and F Big Willie, E Aerials, D Resistors (switch)
Wave 9: D Resistors with Jacob, then A Resistors
Wave 10: B and C Aerials, A and E Blitzers
Wave 11: D Resistors, A Blitzers, D Jacob with Resistors
Wave 12: D Breakers, B and C Aerials, C Tommys
Wave 13: C Jacob with Resistors, B air, A Blitzers C Resistors, A Blitzers, C Resistors (switch)
Wave 14: D Aerials, E Burst Transmitter with Jacob
Wave 15: E Jacob with Breakers and Aerials x2
Wave 16: Jacob with Resistors, followed by Bltizers
Dos and don’ts
Do
- stick to the suggested emplacement order
- target Jacobs first
- take out aerials sooner rather than later
Don’t
- over-emplace the front
- get downed on a blitzer wave
- let the backdoor jacobs-resistor combos overrun you
Click here for more Trenched Walkthroughs and tips and Tricks

