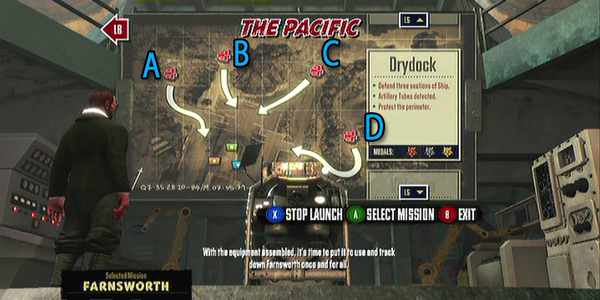
Trenched Pacific Drydock map guide
Featured in this guide
Arty, Sniper Cannons
Double Fine’s quick tips
Map layout
- Defend three sections of the Ship
- Artillery Tubes detected
- Protect the perimeter
Recommended Trench loadout
- Long Range Weapons
XBLAFans gold medal advice
XBLAFans recommended loadout
- Karlsson Chassis
- Deadly Rain Artillery Cannon
- Machine Guns
- Quickload/Sprinting Legs
Ah, another symmetrical mission, how they are so fun and manageable. So for Drydock, it’s important to focus the early emplacement game on the A and D conduits. Setup two machine gun turrets, followed by dampeners. Having the Karlsson means a expensive emplacements, so for the first half of the game the trench will be defending the center. The Deadly Rain artillery cannon has MIRV, which means it’ll drop grenades as it flies through the air. That means arc it high and predict the path of the tubes to get the most out of this cannon; efficient use of the Deadly Rain will result in easy victory here on Drydock.
After placing your MG turrets and dampeners on each side, place two MG turrets on the small square corners of each side platform (right in front of the ramp) so they can cover the mid and the sides at the same time. Lastly will go a dampener in the center where B and C converge followed by an MG turret behind it. There’s a good chance your dampeners will be destroyed periodically by burst transmitters, so watch them and upgrade the left and right-most MG turrets, then work your way to the middle. This mission’s pretty easy as long as you keep the sides secure and don’t let Arty’s shell the ship.
Wave breakdown
Wave 1: B and C Tommys
Wave 2: A Resistors followed by C Resistors
Wave 3: B Resistors the D Resistors
Wave 4: A Knobs, B Tommys
Wave 5: Blitzers on B and C then Blitzers on A with Resistors
Wave 6: A Burst Transmitter, Resistors on B
Wave 7: C Resistors D Burst Transmitters
Wave 8: B Resistors with Jacob, C Resistors with Jacob
Wave 9: Arty on C
Wave 10: D Tommys then A Tommys
Wave 11: C Resistors with Jacob, then B Resistors with Jacob
Wave 12: D Resistors D Knobs followed by A Resistors and Knobs
Wave 13: C Resistors B Tommys, C Resistors with Burst Transmitters
Wave 14: C Blitzers and Arty B Arty and Blitzers
Wave 15: C Resistors with Jacob A Resistors A Tommys
Wave 16: D Bertha, followed by A Bertha
Wave 17: C Arty, A Tommys, B Jacobs and Blitzers, C Jacobs and Blitzers followed by B Arty
Dos and don’ts
Do
- hold the center down with your trench
- keep the side emplacements upgraded as the game goes on
- fire artillery early in waves to weaken incoming hordes
Don’t
- let burst transmitters destroy your large investments
- quickload too often
- have MG turrets with no dampeners
Click here for more Trenched Walkthroughs and tips and Tricks

