Trenched Europe Refinery map guide
Featured in this guide
Burst Transmitters, Mine Layers
Double Fine’s quick tips
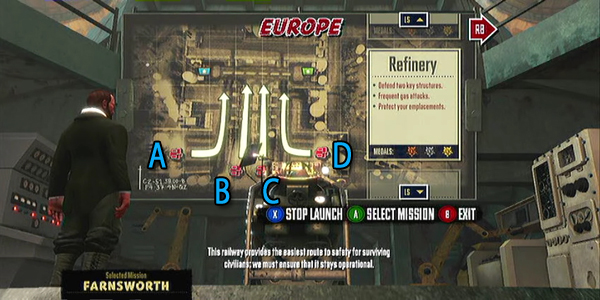
Map layout
- Defend two key structures
- Frequent gas attacks
- Protect your emplacements
Recommended trench loadout
- Mine Layer
- Sprinting Biped Legs
XBLAFans gold medal advice
XBLAFans recommended layout
- Engineering Chassis (Honeychurch recommended, purchase at store if available)
- Mine Layer emplacement, Shotgun emplacement
- Sprinting Legs
- Machine Guns
Getting gold
The Refinery is fairly simple as all four paths can be watched by the player at the same time. This level introduces Burst Transmitters that will destroy non-camouflaged emplacements. The level also features gas attacks that will limit player and emplacement vision. We recommend using the dampening generator-shotgun turret combo at A and D close to the bases but not within the Tommy’s range to practically guarantee its safety. Clean up with your guns if there are too many. No enemies will spawn at A or D until wave 8, but there will be a ton of Tommys at ?A on that wave so be prepared by then.
In the meantime, your focus should be on B and C. Burst transmitters will be a constant nuisance, if you can afford it you’ll want two mine layers on each side followed with another shotgun-dampener combo. Ideally, from the conduit you’ll want a mine layer, then a dampener, then another mine layer, then a shotgun turret. This ensures your shotgun’s protection as the Burst Transmitters will take their time removing the dampener first. Upgrade the mine layers enough and the shotgun turret will hardly even be used. Use collection prongs to pick up scrap as you likely won’t have time to get from A to D constantly. Make sure to take out the gas worms quickly so no tubes sneak past your defenses or worse, destroy them.
Wave breakdown
Wave 1: Spawn C: Resistors
Wave 2: Spawn B: Resistors
Wave 3: Spawn B: Burst Transmitters; Spawn C: Burst Transmitters
Wave 4: Spawn C: Tommys then Spawn B Tommys
Wave 5: Gas; Spawn B: Resistors; Spawn C Resistors
Wave 6: Spawn B: Burst Transmitters; Spawn C: Burst Transmitters
Wave 7: Spawn B: Big Willie then Spawn C: Big Willie
Wave 8: Spawn A: Tommys; Spawn A: Tommys; Spawn A: Tommys
Wave 9: Spawn B Tommys; Spawn C: Tommys; Gas then Spawn A: Blitzers
Wave 10: Spawn D: Tommys; Spawn D: Tommys; Spawn D: Tommys
Wave 11: Spawn B: Burst Transmitters; Spawn C: Burst Transmitters then Spawn D: Tommys; Spawn A: Resistors
Wave 12: Spawn B: Resistors; Spawn C: Resistors then Spawn B: Tommys; Spawn C: Tommys; Spawn A Blitzers
Wave 13: Gas; Spawn B: Burst Transmitters; Spawn C: Burst Transmitters
Wave 14: Spawn A: Tommys then Spawn C: Tommys then Spawn B Tommys
Wave 15: Spawn B: Burst Transmitters; Spawn C: Burst Transmitters then Spawn B: Big Willie; Spawn C: Big Willie; Spawn A: Tommys; Spawn D: Tommys
Dos and don’ts
Do
- use mine layers if you have an engineering chassis
- thoroughly cover A and D
- stop burst transmitters ASAP
Don’t
- let Big Willie destroy your emplacements if not using mine layers
- leave the gas worms alone
Click here for more Trenched Walkthroughs and tips and Tricks


