Trenched Africa Oasis map guide
Featured in this guide
Knobs, Broadcasters, Flak Machine Guns, Engineering Chassis, Machine Gun Emplacement
Double Fine’s quick tips
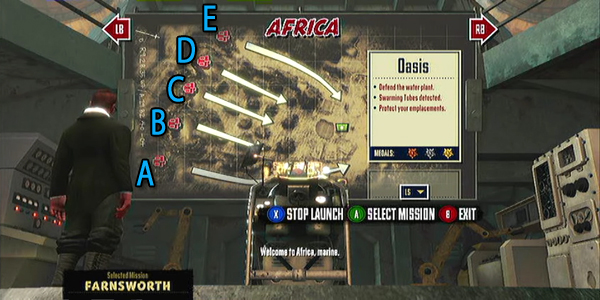
Map layout
- Defend the Water Plant
- Swarming Tubes Detected
- Protect your emplacements
Recommended trench loadout
- Machine Gun Turret
- Broadcaster
XBLAFans gold medal advice
Recommended Players: 2+
XBLAFans loadout
Assault Player: (Recommended for Solo)
- Karlsson Chassis
- Sprinting Legs
- Flak/Ranged Weaponry
- Broadcaster
- Machine Gun & Dampener Emplacements
Solo tips: Bring a sniper and flak on one side with a broadcaster on the other. Setup one machine gun for each section of the map (left, mid, right) and a dampener in the middle. Keep them alive and upgrade the left side first. See below for more details.
Engineering Player:
- Selker Chassis
- Sprinting Legs
- Machine Guns
- Machine Gun, Flak, Dampening and Mine emplacements.
Oasis is a Knob-fest. Tons of enemies filter in through the centers, and delayed spawns all over the place make this a lot of chaos to sort through. As such, our recommendation is to manage it with emplacements. That means going with Selker Chassis (Selker Mk 1 is a guaranteed unlock by this time) and sprinting legs to take care of all the baddies. Spawn A will constantly be an issue for Tommys, so put up machine gun turrets on the rather clearly marked pedestals. Upgrading is good, but both quantity and quality will be necessary to take more out at a time. The Spawn E side is less of an issue, but still put something anti-ground there after wave three. Keep it well upgraded so you don’t get back-doored.
The main theater, so to speak, shall be Spawn B, Spawn C, and Spawn E, where Knobs will filter through and be protected by large rock pillars. While unconventional, using Dampening Generators to draw the Knobs is a great way to protect your more expensive investments in the center. MG Turrets on both sides of the the rocks will ensure that the center knobs won’t be a problem. Aerials are a sneaky issue here, so make sure to put a well-upgraded flak turret near the base in the back. Never let it die, as it’s easy to forget about.
Lastly, the player will be doing much damage control as knobs are a real pain until a secure setup is established. A–side and Flak is an upgrade priority. Late in thegame use mines to protect the A and E lanes if you have the necessary scrap. When Big Willie shows up early, focus on him as the Selker doesn’t have much firepower; once he’s out of the range of your emplacements, the going gets rough. This place is really difficult solo, having the best gear and not losing emplacements is necessary for a solo gold on the first playthrough.
Wave breakdown
Wave 1: A Tommys
Wave 2: B C D Aerials
Wave 3: B Knobs
Wave 4: A Tommys and E Knobs,
Wave 5: A Tommys then D Blitzers,
Wave 6: A Burst Transmitters followed by Tommys
Wave 7: A Big Willie, E Resistors
Wave 8: D Tommys followed by E Knobs
Wave 9: B C and D Knobs, followed by A and E Knobs, followed by B C and D Knobs
Wave 10: A Tommys, then E Tommys and A Blitzers, then B and D Blitzers x2 (need to verify this wave)
Wave 11: A and E Tommys with B C and D Aerials
Wave 12: B C and D Aerials, followed by B C and D Knobs,
Wave 13: A Volt Dropper, note starts at A then circles to E then to middle between C and d
Wave 14: Knobs A thru E, followed by Knobs B C and D, then Knobs A through E followed by Knobs B C and d
Wave 15: Knobs B and D, Aerials on C, the Big Willie on A Knobs on B C and D, then Tommys followed by Knobs on E
Dos and don’ts
Do
- focus on the left side
- use dampeners
- get close
Don’t
- forget about Spawn E
- waste scrap on dampeners
- ignore Tommys
Click here for more Trenched Walkthroughs and tips and Tricks

