

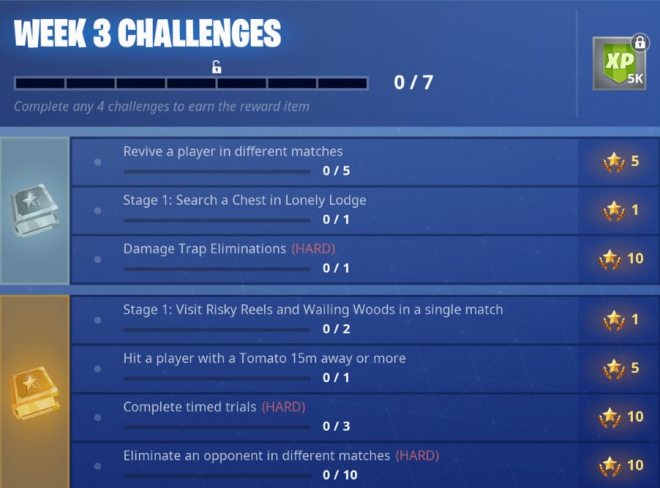
We have arrived in week three of Fortnite Battle Royale season six. This week sees a variety of different challenges, but whether you consider any of these unique is completely up to you. The challenges are both about exploration and decimation. All but one challenge has been presented at least once before in the previous five seasons. There is one unique comedic challenge that can easily be completed with squadmates or a downed opponent. Here are your challenges for week three.
Revive a player in different matches
This challenge requires you to revive players five times in different matches. Previous challenges of this sort simply asked you to revive players, but now you may only revive one player per match, which means you’ll need to play a total of five matches to complete this challenge. Playing the game as normal in Duos, Squads, or 50v50 should net you the challenge over time, but if you want it done as quick as possible, here’s what you do. Grab a friend and head to duos. Land on the corner of the map, farm a few materials and build a ramp 10 levels high. Simply jump off the ramp, and have your teammate revive you. Now have your teammate climb the ramp and jump off, revive him. Play the match as normal till you’re both eliminated. Then simply rinse and repeat.
Stage 1: Search a Chest in Lonely Lodge
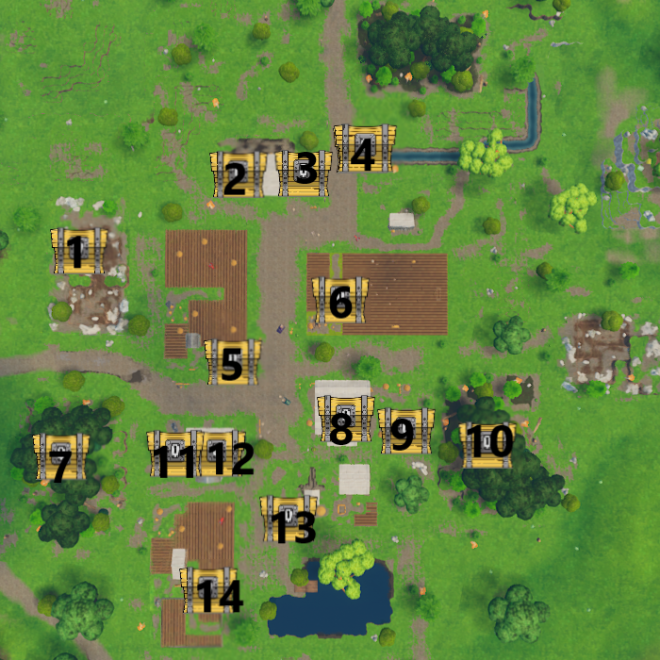
By this point, this type of challenge should be familiar. For the five stages of this challenge, you’re going to want to head to the location and loot one chest. Below you’ll find a treasure map of each location, as well as brief explanations of where the chests are located. The first stage is Lonely Lodge.
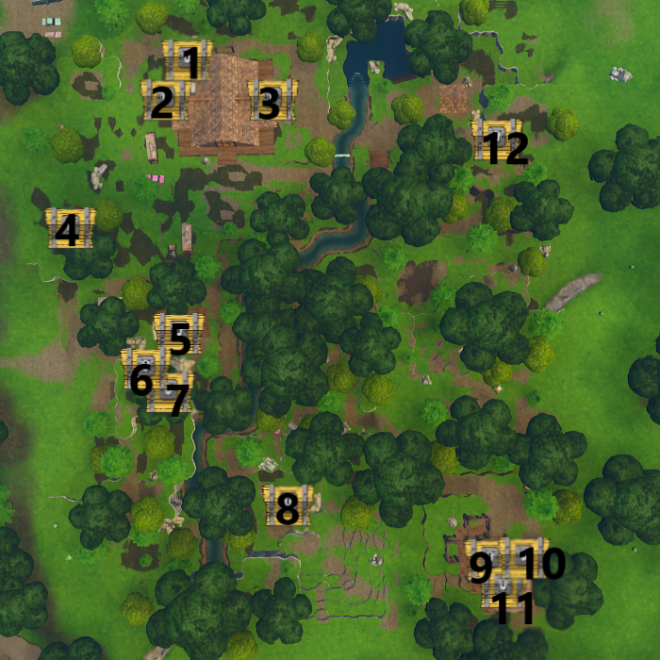
- Inside the lodge on a balcony/ledge. Break the wall upstairs or build a staircase up to it to access.
- Behind a wall in the back of the western room.
- Behind a wall opposite the stairs, simply break the upper part of the wall to access.
- Under the roof of the western triangle hut. Build up and destroy the roof to access.
- Inside of a building directly south of the main lodge. The chest is upstairs in a room behind a metal shelf.
- On top of the cliff on the western end of the area, next to some tents and an old campfire.
- Inside of a cave directly beneath the western cliff.
- Under the roof of the southern triangle hut. Build up and destroy the roof to access.
- In the middle of the tower, destroy a wooden support to access.
- Top of the tower behind the lookout building.
- Inside the lookout building on a shelf.
- Under the roof of the eastern triangle hut. Build up and destroy the roof to access.
Stage 2: Search a Chest in Retail Row
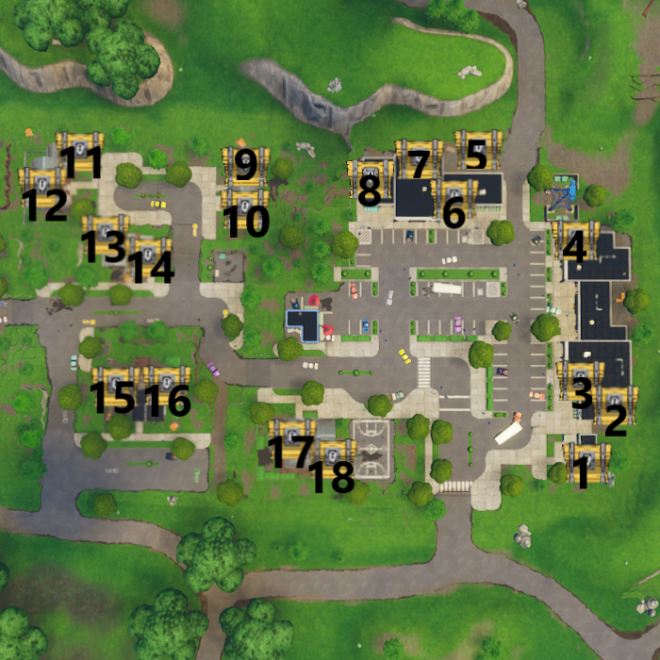
- On top of the water tower.
- Behind the bar.
- 2nd floor of the bookstore. Go through the door and turn left, it’s in a corner.
- 2nd floor of the fishing store. Go through the door and hang a right. Alternatively, you can reach this chest by landing in between the bookstore and the fishing store and going through a door as well.
- Inside of the truck parked here.
- Inside the detective agency on a desk.
- After destroying the garage in the back of the food market, it’ll be above you on a metal shelf. Can be easily accessed by building stairs on the outside and destroying the wall.
- In the far left side of the food market.
- In the attic of the northern white house.
- Above the garage of the northern white house.
- Above the garage of the red brick house.
- In the attack of the red brick house.
- Located at the very top of the destroyed house. Destroy the roof to access it.
- In the basement of the destroyed house in a small room behind a wooden crate.
- In the attic of the balcony house.
- In the room straight ahead of you upon reaching the 2nd floor from the stairs in the balcony house. The chest will be behind the door as soon as you walk in.
- In the attic of the southern white house.
- In the dog house in the back of the southern white house. Destroy the dog house first to be able to be able to open the chest.
Stage 3: Search a Chest in Snobby Shores
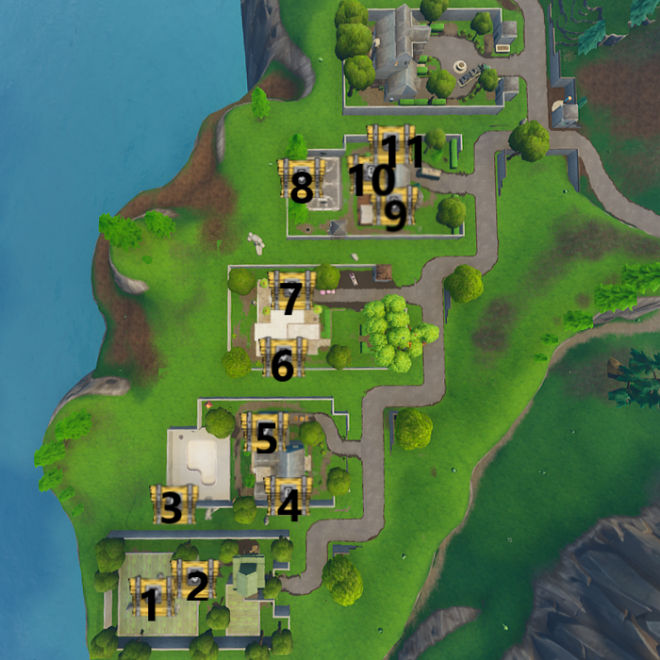
- In a basement which can either be accessed by destroying the floor, or the dresser that blocks the stairway down. This chest can be found on top of the fridge.
- Also in the basement, on a shelf.
- Behind the bar next to the pool.
- In the attic of the 2nd house.
- Above the garage of the 2nd house.
- In a bathroom on the 3rd floor of the 3rd house.
- In a lookout room on opposite side of the 3rd floor of the 3rd house.
- On a bench near the basketball court in the backyard.
- In the attic of the 4th house.
- In the basement of the 4th house.
- Above the garage of the 4th house.
Stage 4: Search a Chest in Fatal Fields
- In a little quarry area on a ledge behind some rocks.
- In the horse stable on the left side above the entryway on a ledge.
- In the horse stable on the right side above the entryway on a ledge.
- In a little rock crevice in the river.
- In a shed on the left side of the middle area.
- In a shed on the right side of the middle area.
- In the forest on the left up against a big tree. Look for its glow or listen for the unique sound.
- In the barn. Run up both sets of stairs, and it’ll be across the walkway.
- In a bigger shed with two entryways, on a ledge above the entryways.
- In the forest on the right up against a big tree. Look for its glow or listen for the unique sound.
- Inside the house. Head upstairs, go into the door at the end of the hall (should be a bathroom). The chest will be on the other side of a broken wall.
- Inside the house, head up to the attic. Immediately turn right at the top of the stairs, and it’ll be tucked away in a corner on the right.
- Inside one of the two silos. You need to destroy the silo to expose the chest.
- In the south most part of the area. Inside the bigger shed of the two behind some hay.
Stage 5: Search a Chest in Pleasant Park
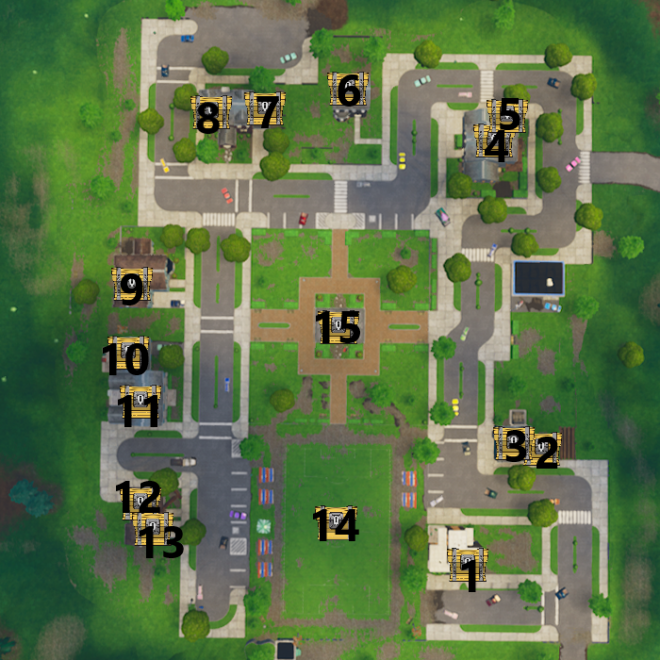
- In the garage of the modern house to the southwest.
- Above the garage of the eastern house.
- In the storm cellar of the eastern house.
- In the attic of the northeast house.
- In the doghouse outside
- In the attic of the northern house.
- Above the garage of the northwestern house.
- In the attic of the northwestern house.
- In the attic of the middle western house.
- Above the garage of the lower western house.
- In the attic of the lower western house.
- Under the ceiling of the lower roof of the southwest house. (the one with the tree collapsed on top).
- Under the ceiling of the higher roof of the southwest house.
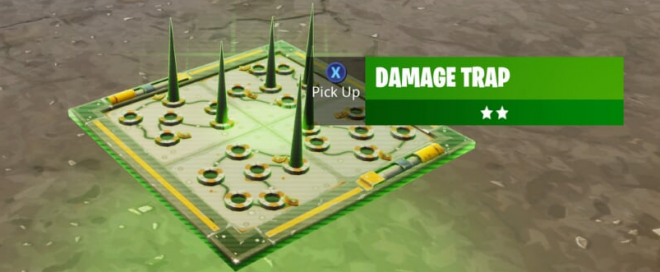
Damage Trap Eliminations
This challenge shouldn’t come as a surprise as it’s been a part of the battle pass challenges once almost every season. Thankfully this challenge isn’t anywhere near as annoying as it used to be. For the challenge, don’t make this any harder than it needs to be. Head to Duos or Squads, loot until you find a damage trap. Now down an opponent, build a wall near him and place a trap. The trap will eliminate him instantly and you’ll get credit. Simply finish the match and the challenge is finished. Here’s the item to keep a look out for.
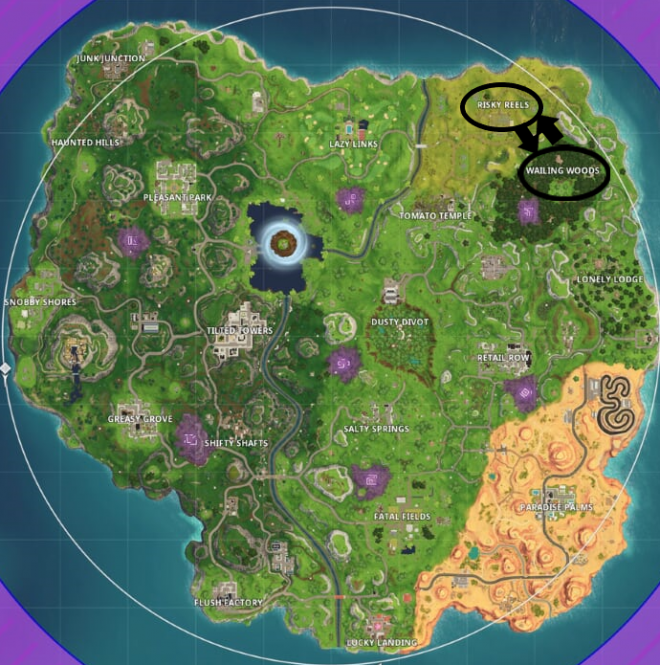
Stage 1: Visit Risky Reels and Wailing Woods in a single match
The next five stages of challenges require no real effort. Simply visit the two named locations in one match, and you’ll finish that stage of the challenge. After doing so, simply finish the match and the next stage will appear in your challenge list. For the first stage, players are challenged to visit Risky Reels and Wailing Woods in the same match. This is simple as both are right next to each other.
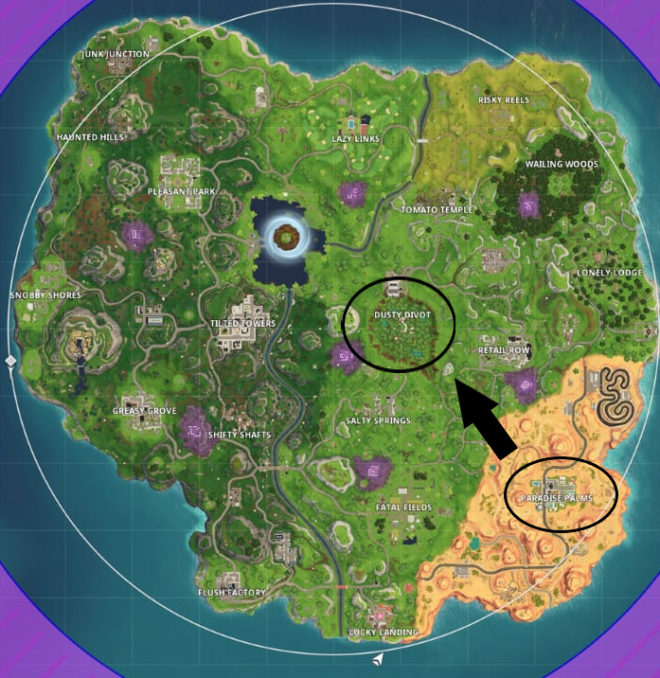
Stage 2: Visit Paradise Palms and Dusty Divot in a single match
For stage two, you’ll need to visit Paradise Palms and Dusty Divot in the same match. Dusty isn’t far from Paradise, but there is a lot of open areas. The best course of action here is to start at Paradise Palms, land in the city, then find a rift and fly to Dusty Divot. You only need to get in the vicinity of Dusty Divot for the challenge to give progress. Now complete the match as normal.
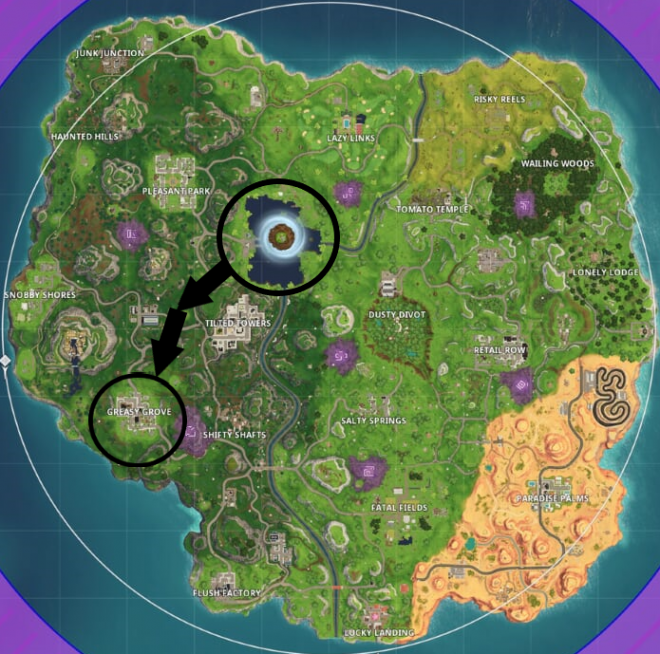
Stage 3: Visit Greasy Grove and Leaky Lake in a single match
It might seem logical to land at Greasy Grove first, but quite the contrary, if you land at the factories on the left side of Leaky Lake and then head towards the left side of the outside of Tilted Towers towards Greasy Grove, you’ll have an easier time. Greasy Grove is a far more popular landing site, and getting out alive after landing here first could prove difficult, this is why it’s best to do these locations opposite.
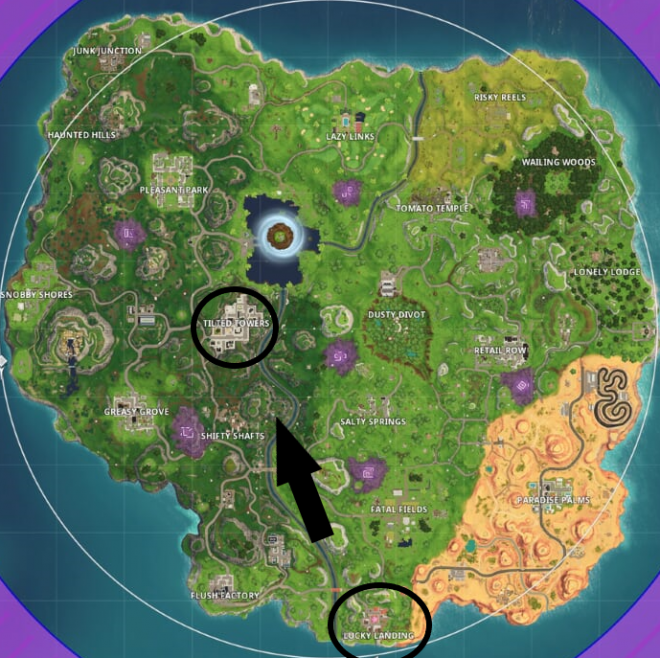
Stage 4: Visit Lucky Landing and Tilted Towers in a single match
Lucky Landing isn’t nearly as popular as Tilted Towers so it’s the better option for landing at first. Not only that, the spot where the road from the desert ends just east of Lucky Landing has a truck hanging off it, and more often than not, a rift spawns here. This can help give you some distance towards getting to Tilted Towers. You’ll most likely land near the corrupted zone just under Salty Springs. Run the rest of the way or consider collecting a Rift-to-Go or launch pad to get you the rest of the distance. A word of warning, unlike almost every other location in this challenge, Tilted Towers requires players to be almost inside the city itself before the challenge counts. Make sure you see the progress bar come up, and then finish the match.
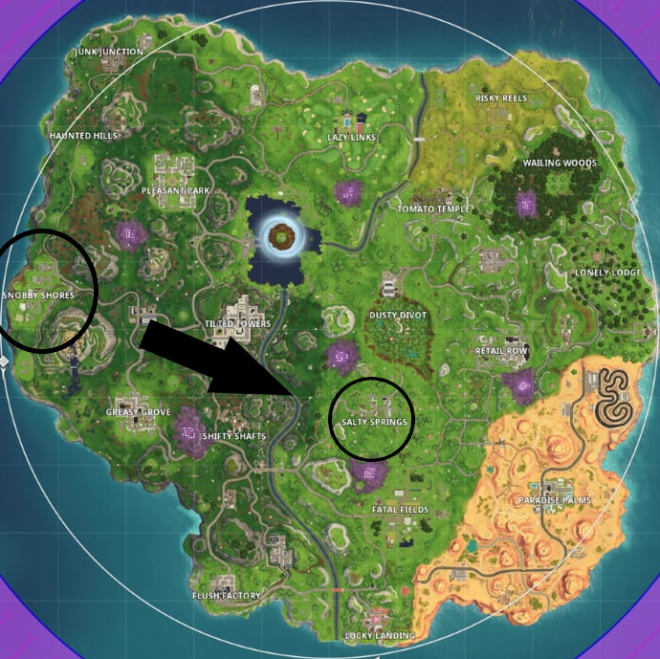
Stage 5: Visit Snobby Shores and Salty Springs in a single match
The final stage has you visiting both Snobby Shores and Salty Springs in a single match. For this challenge, it’s best to start by landing at Snobby Shores and make your way east to Salty Springs. The reason for this is that after hitting Snobby Shores, you can climb up the mountain towards the Viking Village, and take a rift towards Salty Springs. Doing this stage the opposite way would require you to cross the death stream near Shifty Shafts and Tilted Towers. After visiting both locations in the one match, finish the match and you’ll have finished all exploration stages. Well done!
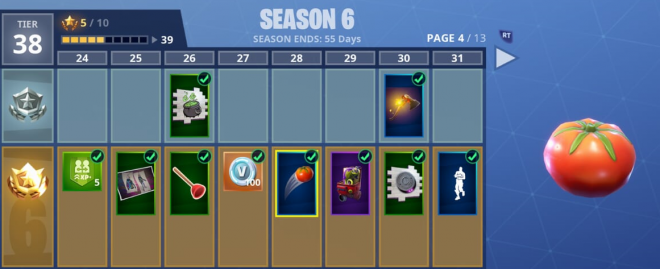
Hit a player with a Tomato 15m away or more
The unique challenge of week three tasks players with hitting a player with a tomato from 15m away or further. This is a battle pass challenge for a reason, as before you can even complete the challenge, you’ll need to have unlocked the Tomato emote which unlocks at tier 28. After unlocking the emote, equip it in one of your emote slots. There are three ways you can do this challenge. Play a match with a friend in Duos, land on the outer edge of the map and try to throw a Tomato at each other. You could also throw Tomatoes at teammates standing still in 50v50 and try to get the challenge that way. Finally, you could down an enemy and try to tomato them from a distance, which is funnier, but riskier. The left side of the screen which shows the kill feed will tell you the distance at which your tomato hit somebody. Just make sure the distance is 15m or more and you’ll get your progress. Simply finish the match and the challenge is completed.
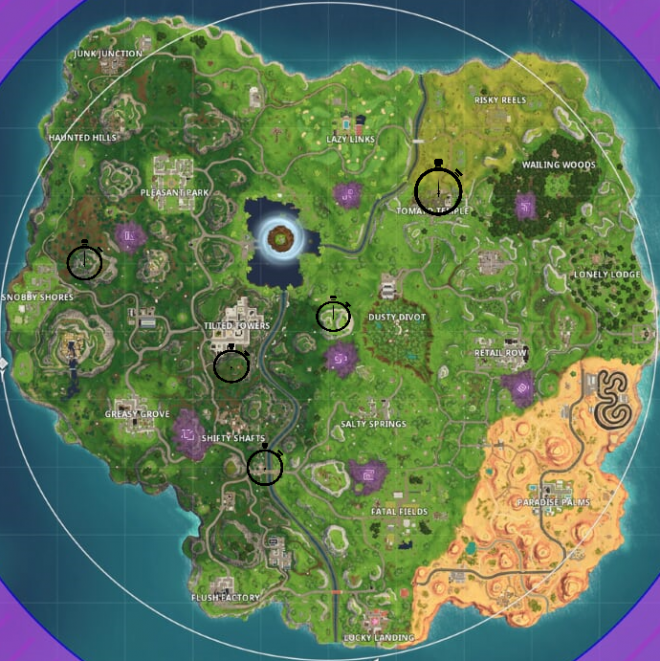
Complete timed trials
Similar to season four, semi-transparent stopwatches are located around the map. Once you find one, Interact with it by holding X and it will activate the time trial challenges. Simply collect all the stopwatches in the vicinity to finish the challenge. Some trials are easier than others, having you run and build a small amount to collect each stopwatch. Others are harder and require you to build higher up, making you an easier to spot from a distance. The easiest timed trials are located at the bridge right below Shifty Shafts, the old rocket base to the northeast of Snobby Shores, and the one on the cliff southwest of Salty Springs. The timed trial on the cliff above Tilted Towers to the south requires a lot of building upward and makes you an easy target to the city below, as with the one in Tomato Temple.
Eliminate an opponent in different matches
For the final challenge this week, you must eliminate 10 opponents in different matches. This means you are required to get at least one kill each match. Combining this alongside the challenge to revive five players across different matches can help complete both of these quickly. This challenge is the simple mechanics of the game that are done every match. If you’re not as confident on eliminating opponents, 50v50 makes for a great mode to complete this challenge as many times, enemies stand still or don’t react by building a fortress when they are shot, making for easy targets.
Do you still have challenges from previous weeks? Check out our Fortnite Challenge Guide Hub.
The Author
