Dungeon Defenders Alchemical Laboratory (level 4) guide
Strategy breakdown
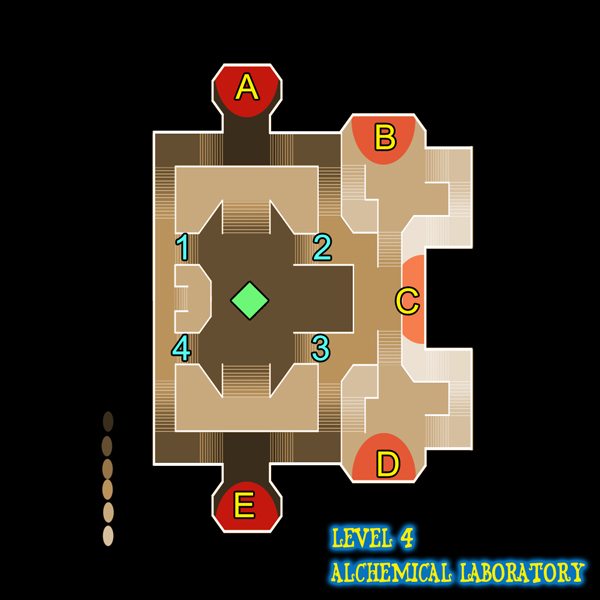
The first few waves will be business as usual. Find the larger Orc enemies and make them your priority. Beef up choke points 2 and 3 as they will be the most attacked areas.
When wave 5 starts you will see the return of the Kobalds. As usual, they take priority over every other enemy type. Wave six will be the same as wave 5 but in larger numbers. You will also notice that at this point, the enemies are all a little stronger and quicker. As you level-up your character through the game, the enemies will also level-up. Just make sure you are checking the weapon droppings after each wave so you can keep up with the difficulty curve.
Wave 7 will include a few Mage’s that are now your top priority. The Mage enemies will carry a staff with a cow skull on the top of it and they will constantly spawn skeleton enemies while reviving the health of all the enemies around them. If you don’t take care of them quickly, they will really slow your progression through this wave. There will be two Mage enemies at doors A, C, and E. Keep an eye out for these enemies. If you have a tough time locating them in the large crowds of enemies, look for an area where red cross health icons keep flashing on above a lot of enemies at once. Those icons mean that a Mage is in there somewhere and he is creating quite a problem.
Boss Breakdown
At the end of the 7th wave, you will have a few seconds until the first real boss fight of the game triggers. A flying demon boss will appear and have over 30,000 health. This boss cannot hurt the crystal but he can destroy your traps and towers making it very easy for all the other enemies to hurt your crystal. He will generally attack areas where you are standing so you’ll want to avoid standing near your choke point barricades because of this. He will shoot fire balls at you and slam his swords on the ground while trying to hit you. Keep him as near the crystal as possible by baiting him into walk small circles around it. He will also shoot lines of fire across the ground, so make sure you are always moving.
You can attack the four lightning rods surrounding the middle of the level and this will trigger an electrical shock that hits the Demon boss. He will then remain stunned for a few seconds and any damage you deal to him will be critical making him much easier to kill. Try to do this a few times and you should have no problem bringing him down. This isn’t necessary in order to defeat him, but it is clearly the most efficient route to take for this battle.
Tips & tricks
- At the choke points, try to build a barricade with ranged weapons right behind that barricade. Also look to build ranged towers along side the barricades at the higher elevation points where enemies won’t attack.
- Instead of repairing traps and towers, upgrading them will help save you money. So if a trap or tower is badly damaged, just upgrade it. In this level, no trap or tower should need to be leveled up more than once in order for you to beat it with ease.
- During the 5th and 6th waves, the Kobald enemies with dynamite on their backs take priority over the larger Orc enemies. They may look small and harmless, but these guys pack a mean punch if you let them get near your choke point barricades.
- During the 7th wave, the Mage’s are top priority. Letting them heal other enemies pretty much undoes all your hard work. So make sure you take care of these enemies quickly.
- When fighting the Demon boss, make sure you stay in the middle of the map and walk small circles around the crystal. Provoking the demon boss to attack you while you stand near choke points will lead to your traps and towers being destroyed very quickly. It’s better to die than to let your traps and towers be destroyed.


