

Ascend: Hand of Kul – The World Guide
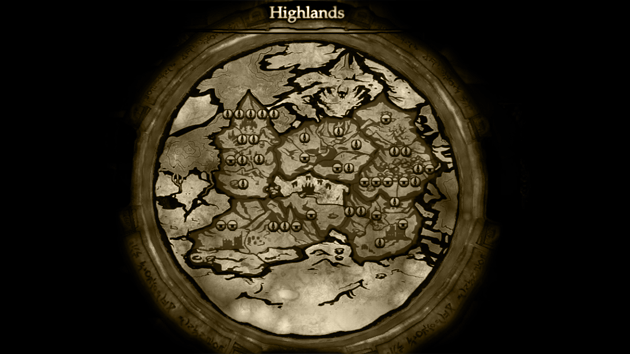
The world of Ascend: Hand of Kul ranges wildly in size, scale and variety. It is broken down into 26 distinct Levels, which form together to create 5 independent Zones, which are all part of the greater Region. Currently, there is only one playable Region, The Highlands, however the developer has stated that additional regions are in the works and will be deployed as free content at some point in the future.
Within The Highlands, the five Zones each employ a theme: mountainous terrain, forestland, and swampland, requiring the player to complete unique challenges and tasks to progress. Each zone is subdivided further into 5-6 Levels, where the player will spend the majority of their time fighting to convert altars and shrines in the name of their God. When all the altars and shrines in a particular level are captured in their favor, the entire level will be converted to display the alignment of their God.
Below you’ll find a list of every Level within The Highlands, the number and quality of chests contained within as well as the number and type of dominion points to control. Upon entering an area, all chests, dominion points and dungeons appear on the map for easy navigation. The only points of interest that do not initially appear on the map are Lore Stones, which must be discovered first. For the complete list of Lore Stones and their locations, visit the Lore Stones section of this guide.
[Note: Story spoilers are contained below, if you’re interested in organically experiencing the Ascend: Hand of Kul campaign – and you should be – avoid this information for now.]
Mount Crimhorn
Mount Crimhorn is the first area you’ll encounter when leaving the Sanctum. Unlike all other Zones, Mount Crimhorn contains six Levels instead of the standard five, to allow for the lengthy tutorial. In this area you’ll first encounter the Titan, get familiar with the inner workings of the game, and unlock the Zone hub: The Hand of Kul.
Mount Crimhorn, Crimhorn Foothills
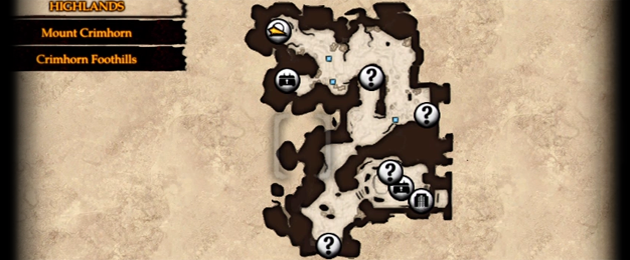
| # of Chests | Normal | Blue Chest | Gold Chest | Epic Chest | Dominion Points | Altar | Shrine |
| 2 | 2 | 0 | 0 | 0 | 0 | 0 | 0 |
Mount Crimhorn, The Arena

| # of Chests | Normal | Blue Chest | Gold Chest | Epic Chest | Dominion Points | Altar | Shrine |
| 0 | 0 | 0 | 0 | 0 | 0 | 0 | 0 |
Mount Crimhorn, Crimdol Wall
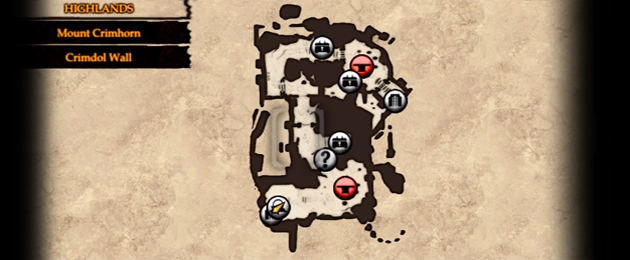
| # of Chests | Normal | Blue Chest | Gold Chest | Epic Chest | Dominion Points | Altar | Shrine |
| 2 | 1 | 0 | 1 | 0 | 2 | 2 | 0 |
Mount Crimhorn, Crimhorn Summit
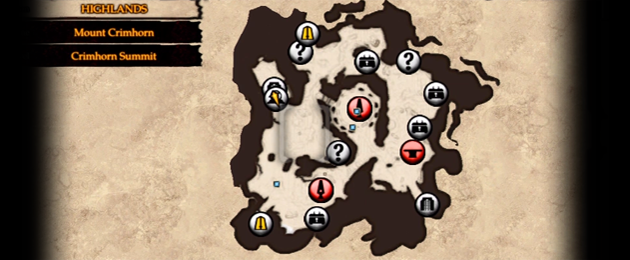
| # of Chests | Normal | Blue Chest | Gold Chest | Epic Chest | Dominion Points | Altar | Shrine |
| 4 | 3 | 0 | 1 | 0 | 3 | 1 | 2 |
Mount Crimhorn, Valley of the Pilgrims
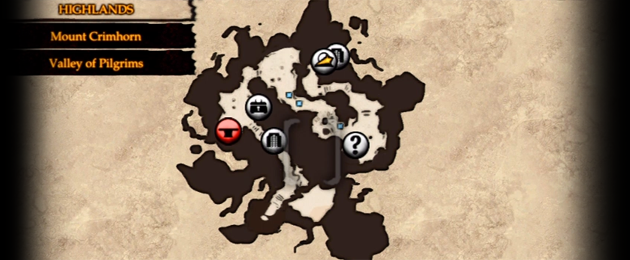
| # of Chests | Normal | Blue Chest | Gold Chest | Epic Chest | Dominion Points | Altar | Shrine |
| 1 | 1 | 0 | 0 | 0 | 1 | 1 | 0 |
Mount Crimhorn, Hand of Kul
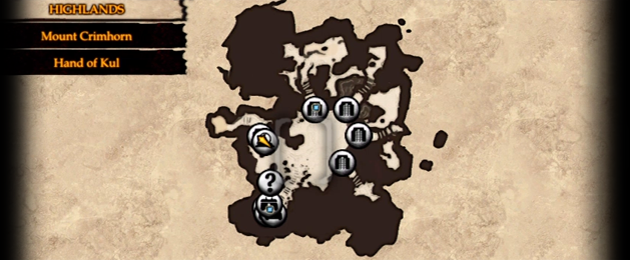
| # of Chests | Normal | Blue Chest | Gold Chest | Epic Chest | Dominion Points | Altar | Shrine |
| 1 | 0 | 0 | 0 | 1 | 0 | 0 | 0 |
Ruined Cliffs
The Ruined Cliffs is the second Zone you’ll access during Ascend‘s campaign progression. It contains much of the same scenery as Mount Crimhorn, but begins to ramp up the storyline. It houses the first mandatory dungeons in The Highlands, the first encounter with some of Ascend‘s largest enemies and the confrontation with the first of the four Apex: Dakrum, The Shadow.
Ruined Cliffs, The Battlements
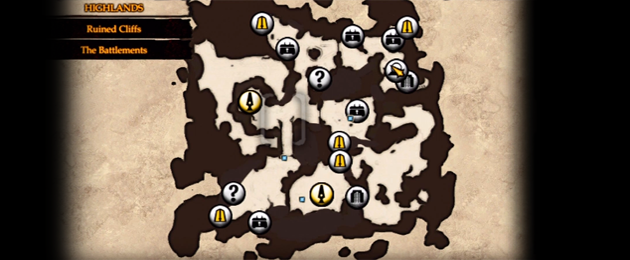
| # of Chests | Normal | Blue Chest | Gold Chest | Epic Chest | Dominion Points | Altar | Shrine |
| 5 | 4 | 0 | 1 | 0 | 2 | 0 | 2 |
Ruined Cliffs, The Gray Fane

| # of Chests | Normal | Blue Chest | Gold Chest | Epic Chest | Dominion Points | Altar | Shrine |
| 4 | 1 | 1 | 1 | 1 | 1 | 1 | 0 |
Ruined Cliffs, Fortress Ur
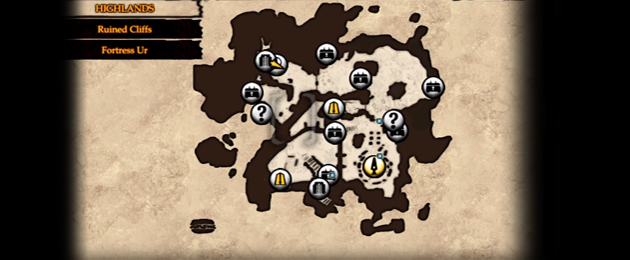
| # of Chests | Normal | Blue Chest | Gold Chest | Epic Chest | Dominion Points | Altar | Shrine |
| 6 | 3 | 2 | 1 | 0 | 1 | 0 | 1 |
Ruined Cliffs, Kung Gol

| # of Chests | Normal | Blue Chest | Gold Chest | Epic Chest | Dominion Points | Altar | Shrine |
| 3 | 2 | 1 | 0 | 0 | 1 | 1 | 0 |
Ruined Cliffs, Ring of Bones
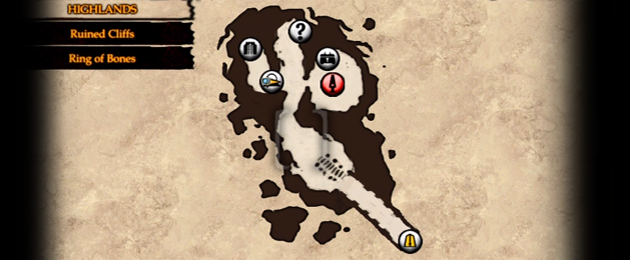
| # of Chests | Normal | Blue Chest | Gold Chest | Epic Chest | Dominion Points | Altar | Shrine |
| 1 | 1 | 0 | 0 | 0 | 1 | 0 | 1 |
Ghostfang Wildlands
The Ghostfang Wildlands is the third Zone accessible during the Ascend campaign. It introduces a forest biome inhabited by twisted wildlife and impassible vines until mandatory dungeons are completed. Within the Ghostfang Wildlands, you’ll encounter the second of the four Apex: Kadin, the Stalker.
Ghostfang Wildlands, Sullan Hollow
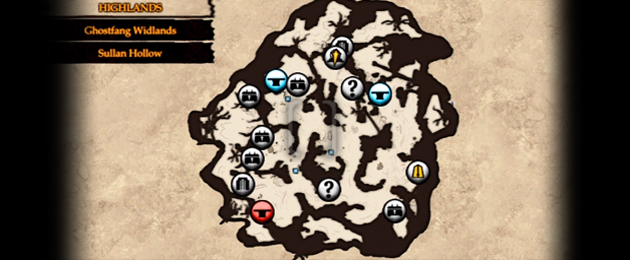
| # of Chests | Normal | Blue Chest | Gold Chest | Epic Chest | Dominion Points | Altar | Shrine |
| 5 | 4 | 0 | 1 | 0 | 3 | 3 | 0 |
Ghostfang Wildlands, Shadow Glen
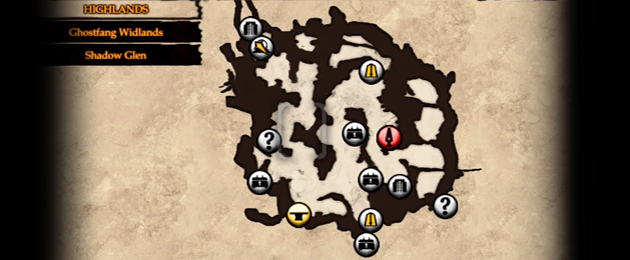
| # of Chests | Normal | Blue Chest | Gold Chest | Epic Chest | Dominion Points | Altar | Shrine |
| 4 | 3 | 1 | 0 | 0 | 2 | 1 | 1 |
Ghostfang Wildlands, Wisp Grove

| # of Chests | Normal | Blue Chest | Gold Chest | Epic Chest | Dominion Points | Altar | Shrine |
| 2 | 1 | 0 | 1 | 0 | 2 | 1 | 1 |
Ghostfang Wildlands, Heart of Kul
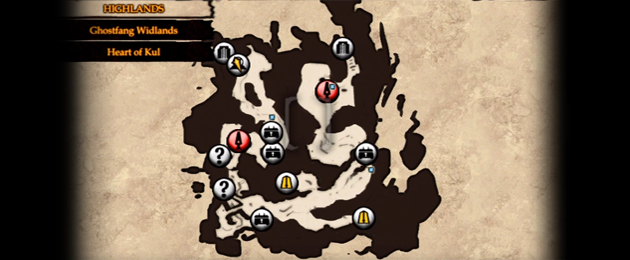
| # of Chests | Normal | Blue Chest | Gold Chest | Epic Chest | Dominion Points | Altar | Shrine |
| 4 | 3 | 0 | 1 | 0 | 2 | 0 | 2 |
Ghostfang Wildlands, Glade of the Stalker
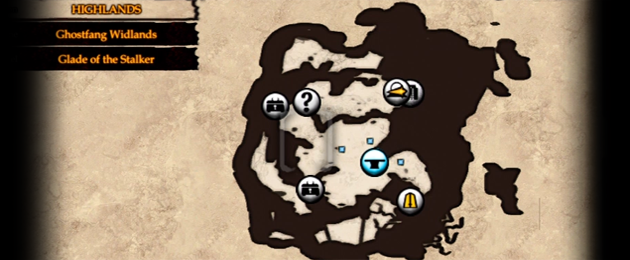
| # of Chests | Normal | Blue Chest | Gold Chest | Epic Chest | Dominion Points | Altar | Shrine |
| 2 | 1 | 0 | 1 | 0 | 1 | 1 | 0 |
Arkan Moors
The Arkan Moors is the third Zone within The Highlands and introduces a swampland aesthetic. In keeping with that theme, Arkan Moors introduces poisonous variants of existing enemies, as well as deadlier troll casters. This Zone also begins to shed light on the end-game story and has a heavier emphasis on interaction with humans. It contains the confrontation with the third of the four Apex: Orveus, The Seer.
Arkan Moors, Lost Marsh

| # of Chests | Normal | Blue Chest | Gold Chest | Epic Chest | Dominion Points | Altar | Shrine |
| 1 | 1 | 0 | 0 | 0 | 2 | 1 | 1 |
Arkan Moors, Fangs of Rel
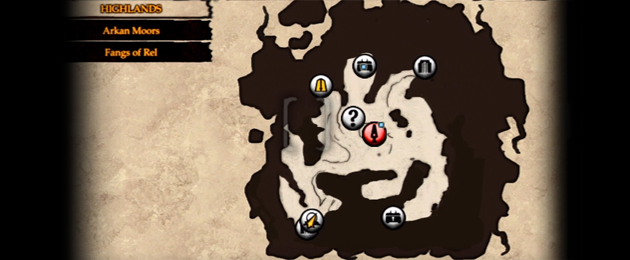
| # of Chests | Normal | Blue Chest | Gold Chest | Epic Chest | Dominion Points | Altar | Shrine |
| 2 | 2 | 0 | 0 | 0 | 1 | 0 | 1 |
Arkan Moors, Gor Loch

| # of Chests | Normal | Blue Chest | Gold Chest | Epic Chest | Dominion Points | Altar | Shrine |
| 4 | 3 | 0 | 1 | 0 | 1 | 1 | 0 |
Arkan Moors, Tower of Broken Souls
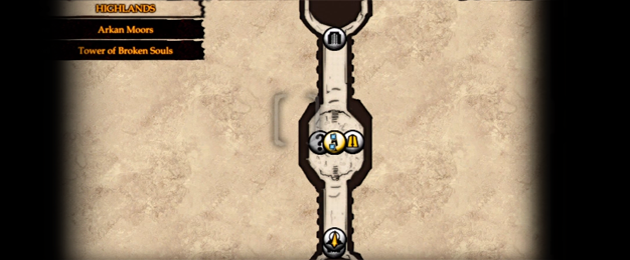
| # of Chests | Normal | Blue Chest | Gold Chest | Epic Chest | Dominion Points | Altar | Shrine |
| 0 | 0 | 0 | 0 | 0 | 1 | 0 | 1 |
Arkan Moors, Well of Gloom

| # of Chests | Normal | Blue Chest | Gold Chest | Epic Chest | Dominion Points | Altar | Shrine |
| 3 | 2 | 0 | 1 | 0 | 1 | 0 | 1 |
Valley of the Dead
The Valley of the Dead is the last of the five Zones that make up The Highlands. It contains heavy emphasis on story and some scripted enemy movements, in addition to special dungeons that must be completed before further Levels can be accessed. The Valley of the Dead is home to not only the last of the four Apex: Magnar, the Slayer, but the entrance to the realm of the Highlands Titan, Kul.
Valley of the Dead, Temple Gates

| # of Chests | Normal | Blue Chest | Gold Chest | Epic Chest | Dominion Points | Altar | Shrine |
| 2 | 2 | 0 | 0 | 0 | 1 | 0 | 1 |
Valley of the Dead, Skull Pit
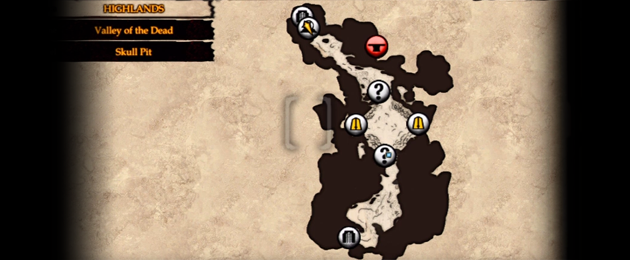
| # of Chests | Normal | Blue Chest | Gold Chest | Epic Chest | Dominion Points | Altar | Shrine |
| 0 | 0 | 0 | 0 | 0 | 2 | 1 | 1 |
Valley of the Dead, Tomb of Kings
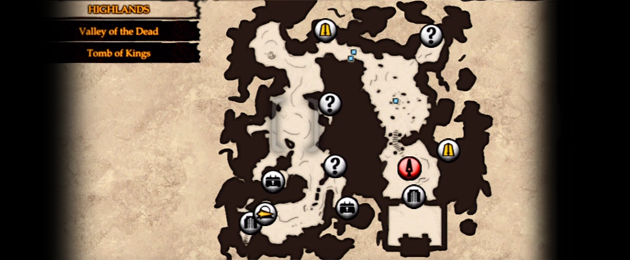
| # of Chests | Normal | Blue Chest | Gold Chest | Epic Chest | Dominion Points | Altar | Shrine |
| 2 | 2 | 0 | 0 | 0 | 1 | 0 | 1 |
Valley of the Dead, Temple of Kul
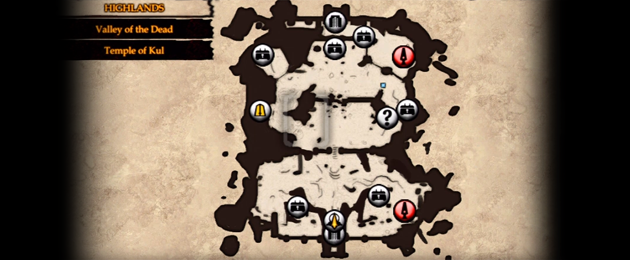
| # of Chests | Normal | Blue Chest | Gold Chest | Epic Chest | Dominion Points | Altar | Shrine |
| 6 | 4 | 0 | 2 | 0 | 2 | 0 | 2 |
Valley of the Dead, Crown of Kul
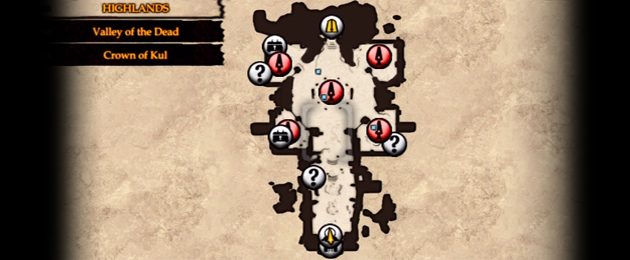
| # of Chests | Normal | Blue Chest | Gold Chest | Epic Chest | Dominion Points | Altar | Shrine |
| 2 | 2 | 0 | 0 | 0 | 5 | 5 | 0 |