
Dungeon Defenders Royal Gardens (level 9) guide


Strategy breakdown
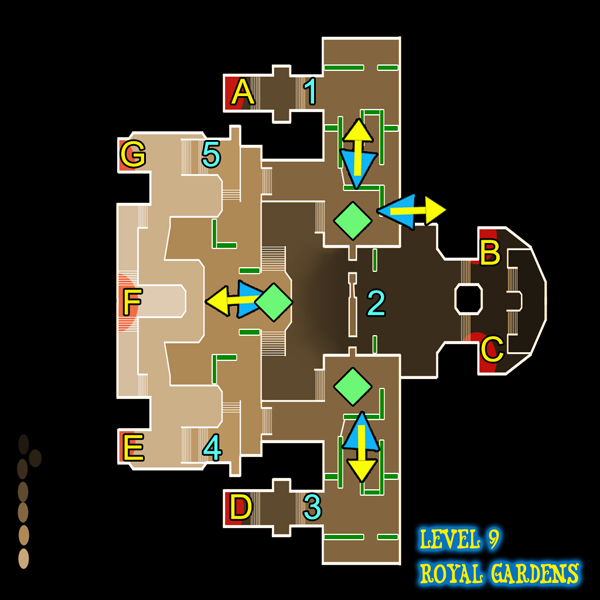
Area 3 begins here, and boy is it a lovely level to start on! Open air, grass everywhere, and plenty of mages and wyverns to get players to sweat. An ogre at 2, wyverns at 1 and mages at 3 will be problems, keeping an eye on 3 for the mage rushes and focusing on the ogre at 2 should mean a successful venture. On top of that, this level can be done pure blockade and tower style for the most part due to the narrow choke points which is a fun change of pace, but it also means traps are super useful here as well and individual heroes. In short, this level is a lot of fun!
Every fun level starts with a solid foundation, however, so get to work setting up blockades at 1, 3, 4 and 5. There’s a lot of enemies at 1 and 3 so be sure to use bouncers, but 4 and 5 may be able to manage with mere magic blockades. However, the real ticket here is in using bowlers at 1 and 3, but fireballs or harpoons at 4 and 5 due to stair situation. Back up these choke points with traps or auras as necessary, but depending on the difficulty and where players are choosing to kill enemies on the map (we advise watching 3 like a hawk) it might not be needed. Harpoons work perfectly for anti-air so place them directly on their marks in our map above as wyverns come from the North, North-East and South only.
The last, and very important, part of Royal Gardens is point 2. This is a pretty big area, just big enough to allow for tons of different strategies. Our recommendation is a slice n dice just in front of the hedges lined up with the fountain, two blockades behind it to funnel enemies into it, and fireball towers to the side of it with a lightning tower if it can be afforded. Don’t put anything on the bridge above as you’ll need that to be clear for quick passage from North to South. The ogres should usually attack here at 2, so be ready when they do.
As for anti-air, follow the instructions indicated on the map, but for extra coverage put a tower facing the Western crystal to help the one facing away from it.
Tips & tricks
- Watch 3 as tons and tons of mages will pour out from D, usually towards the end of the wave.
- 5 and 4 can hold their own but will take a lot of punishment and will need frequent repairs.
- 2 is the most expensive choke point to setup, but it quickly becomes the most self-sufficient, so efforts can be focused elsewhere.
Video Guide