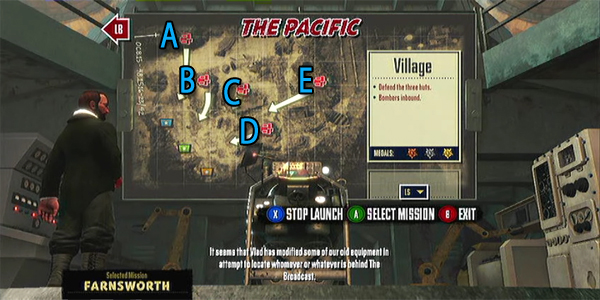
Trenched Pacific Village map guide
Featured in this guide
Volt Droppers, Aerials, Machine Guns, Biped Legs, Engineering Chassis
Double Fine’s quick tips
Map Layout:
- Defend the Three Huts
- Bombers Inbound
Recommended Trench loadout
- Anti-Air Weapons
- Sprinting Biped Legs
XBLAFans gold medal advice
Strongly Recommended players: 2+
Note: 3 players would make this a breeze.
XBLAFans recommended loadout
Turret Trench: (Solo Recommended)
- Selker Chassis
- Sprinting Legs
- Machine Guns (one flak, one standard)
- Flak & MG Lights, Mine & Mortar Heavies
Gun Trench:
- Karlsson Chassis
- Sprinting Legs
- Flak Machine Guns (x3), Machine Guns/Long Range Weapons (Sniper + MG combo)
- Dampener Emplacement, any light
Getting gold
Village presents one of the few levels that’s nearly impossible solo because there’s so much distance to cover and the enemies spawn so close to the objectives. This gold guide assumes the cooperation of at least two players. Getting gold here requires a very strict synergy: Gun Trench places a dampener on both sides of B (one covering the left-mid path, one covering the far left and A path), one for E and one for D. Keeping those dampeners close to B and D are essential to bait the Burst Transmitters so they don’t destroy your larger investments (flak/MG turrets). Gun Trench should also stay near the center where his/her range will best be taken advantage of. Use the rocks to avoid the Snipe Tuner, leave it for last. When the Volt Droppers show up, focus all fire on them, don’t let them bomb any objectives, especially on the last round.
Turret Trench is the squirrel of Village, running back and forth placing Flak turrets (one left, one mid, one right, all behind a dampener) and upgrading dampeners. Placing MG Turrets is doable, so is Mortars or Mine Layers, but there isn’t much scrap to go around on Village (or there probably is but it’s hiding under the water, which is beautiful) so focusing on flak placements and dampener upgrades is absolutely essential. While Gun Trench stays central for the most part, Turret Trench needs to run the field cleaning up after turrets and taking out the enemies that Gun Trench isn’t focused on. With all the aerial enemies, it’s easy to let a resistor or two slip by, and it’s Turret Trench’s job to catch them, especially when the sonic worms come up. Keep the upgrades steady and the coverage smooth and Village gold will be yours.
Wave breakdown
Wave 1: C Aerials
Wave 2: D and B Resistors
Wave 3: A Burst Transmitters and D Burst Transmitters and C Sniper
Wave 4: E Tommys, C Aerials and Worms at defend hut B
Wave 5: A Resistors, B Resistors
Wave 6: B Aerials x2
Wave 7: D Aerials x2
Wave 8: A and B Aerials with E Resistors, then C Sniper with B and D Aerials
Wave 9: A Volt Dropper
Wave 10: E Resistors folowed by Tommys, then Worms in middle hut and D Burst Transmitters
Wave 11: A and B Resistors, D and B Resistors
Wave 12: A and E Aerials, B amd D Aerials
Wave 13: E Blitzers x2, Tommys on D and Dniper on C
Wave 14: A and E Aerials, then D Burst Transmitters, When worms in middle near B and B
Wave 15: B Volt Dropper, B Resistors, D Resistors, C sniper, D Volt Dropper
Dos and don’ts
Do
- watch the skies
- pay close attention to the Wave Breakdown
- bait burst transmitters
- stick to your role
- immediately remove sonic worms
Don’t
- worry about expensive emplacements
- let volt droppers get a chance to bomb
- place emplacements too close to the base
Click here for more Trenched Walkthroughs and tips and Tricks

