
Week 3 of Fortnite’s challenges are upon us. From a glance, you may notice that a lot of the challenges are easy. The funniest thing about the list is that two of the easiest challenges are marked as hard. For those who may not know, the weekly challenge system was revamped with the introduction of season 5. Before, only players who had purchased the battle pass would be able to take part in the challenges. The new system gives basic players three challenges to complete; the other four still require the battle pass to complete. Let’s take a look at what challenges Fortnite has to offer this week.
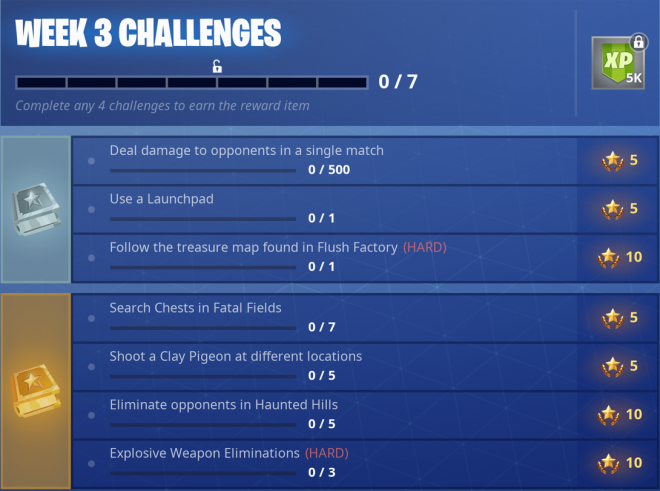
Deal damage to opponents in a single match
This challenge can be achieved in a multitude of ways. The challenge tasks you with dealing 500 damage in a single match. If you die before you achieve it, the counter resets and you’ll need to start over. If you’re playing solo, eliminating five players who each have 100 health will complete your challenge. You could also eliminate three players each with 100 health and shields. Finally, if you aren’t very good at getting eliminations in solo, simply damaging other players while they’re focused on fighting another foe will work as well. This method may take a bit longer to get the 500 total damage, but who knows, you may also accidentally get the elimination. Obviously, teaming up with a partner in duos or a team in squads is another way of achieving the challenge quickly. Just simply work together, call out enemy locations and remember to team shoot. And sadly, yes, thirsting enemies who are downed will count as damage as well.
Use a Launchpad
This is hands down the easiest challenge this week. All you need to do is locate a launchpad, place it down and jump on top of it. Now, remember, the launchpad is a purple item that looks similar to a mini trampoline. This challenge can be achieved in every mode in Fortnite, the exception being playground mode as challenge progression doesn’t count in that mode. By far the easiest mode to complete this challenge quickly would be 50v50, as the floor loot drop rate of launchpads is significantly higher.
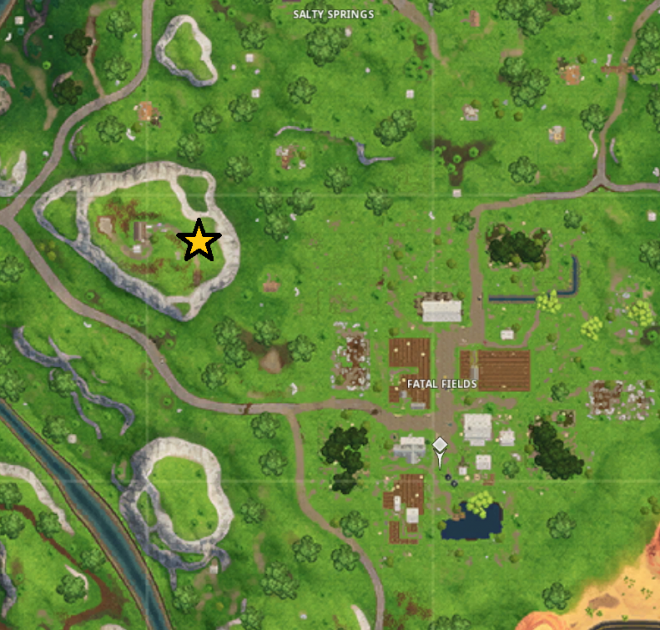
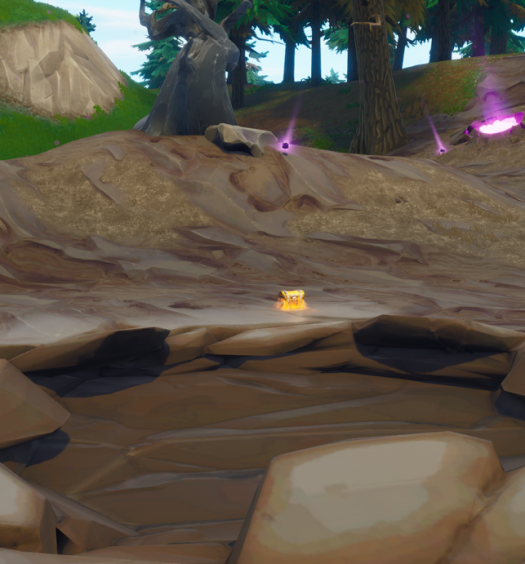
Follow the treasure map found in Flush Factory
The treasure map in Flush Factory was a little difficult to find. Here is the map we are presented with:
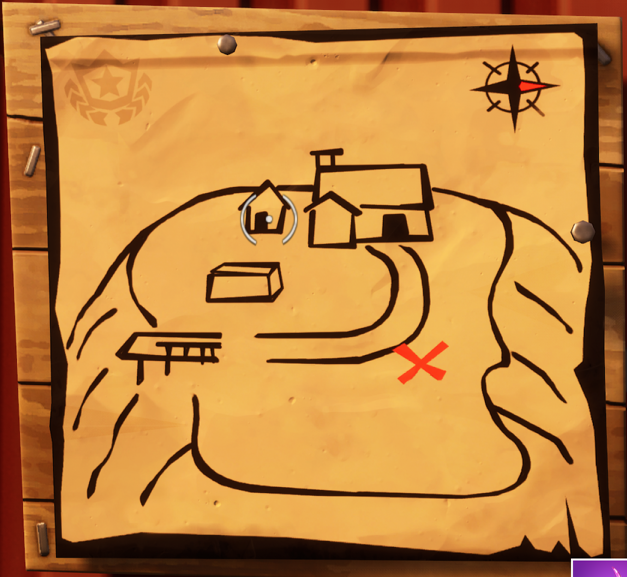
Look familiar? This battle star is located on top of the mountain to the northwest of Fatal Fields. You should see a big house with a shed to the left, a random storage container out front, and what looks to be a little dock leading nowhere. In a patch of dirt out front, you’ll find the star. Here’s a map to get you there:
Search chests in Fatal Fields
This is one of the two challenges that will most likely take you the longest. If you’re trying for these chests in the first few days of the challenges releasing, just know that chances are almost everyone will be going here. With that said, it’s best to be prepared as to where the chest locations are. With that said, below is a map with the locations of every chest located in Fatal Fields.
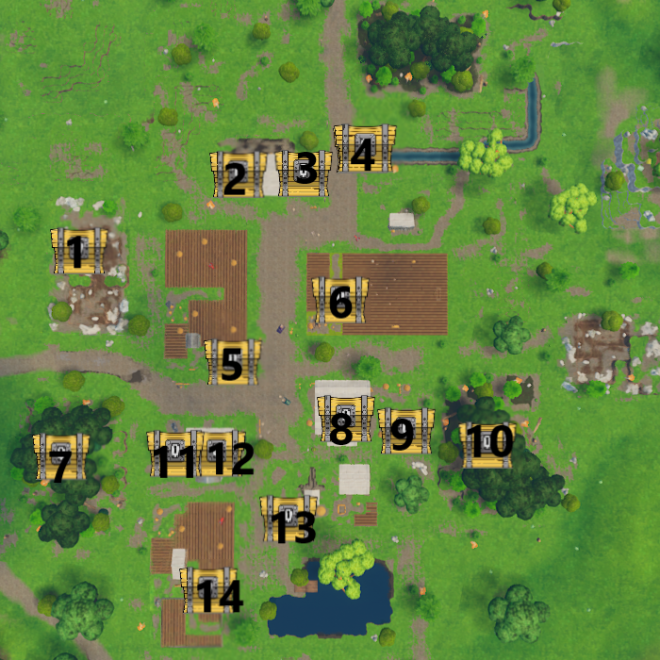
- In a little quarry area on a ledge behind some rocks.
- In the horse stable on the left side above the entryway on a ledge.
- In the horse stable on the right side above the entryway on a ledge.
- In a little rock crevice in the river.
- In a shed on the left side of the middle area.
- In a shed on the right side of the middle area.
- In the forest on the left up against a big tree. Look for its glow or listen for the unique sound.
- In the barn. Run up both sets of stairs, and it’ll be across the walkway.
- In a bigger shed with two entryways, on a ledge above the entryways.
- In the forest on the right up against a big tree. Look for its glow or listen for the unique sound.
- Inside the house. Head upstairs, go into the door at the end of the hall (should be a bathroom). The chest will be on the other side of a broken wall.
- Inside the house, head up to the attic. Immediately turn right at the top of the stairs, and it’ll be tucked away in a corner on the right.
- Inside one of the two silos. You need to destroy the silo to expose the chest.
- In the south most part of the area. Inside the bigger shed of the two behind some hay.
Shoot clay pigeons at different locations
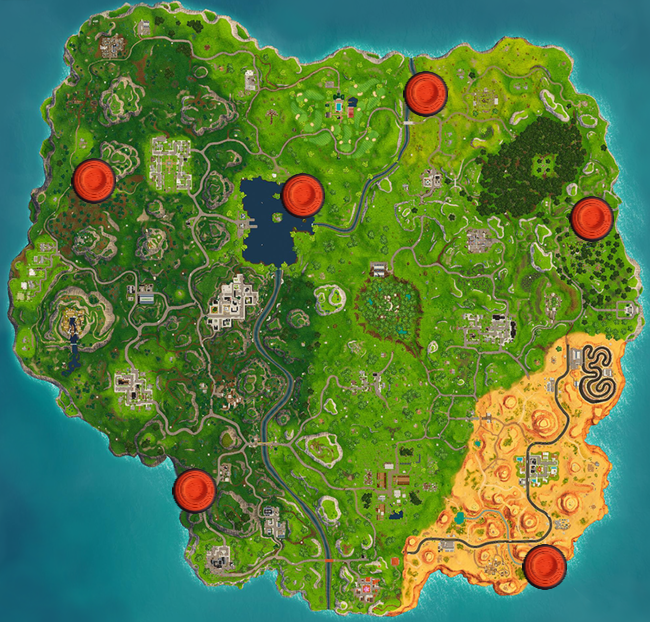
It was clear that once these started appearing in-game, they would be used for a challenge. The challenge asks you to shoot clay pigeons in five different locations, and thankfully there is six in total. Which five you choose to go to is completely up to you. What you will want to do before heading to the location, however, is getting yourself a weapon. It is highly suggested you get either a pump shotgun or a tactical shotgun as the spread of those weapons shots can make it very easy to hit the moving target. A Submachine gun or assault rifle will work but will make the challenge harder than it needs to be. Once you arrive at the location, stand behind the launcher, hold your X button to activate it and then aim down sights. Either a clay pigeon or a rubber ducky will fire out of the launcher. Simply destroy it, and you’ll be counted for that location. Below is a map of all clay pigeon launcher locations.
Eliminate Opponents in Haunted Hills
Should be a relatively easy task. One thing I can definitely recommend is landing at the house just south of Haunted Hills or at Junk Junction to the north to arm yourself, then proceed into the area. The challenge is different this week. Previous weeks have asked you to eliminate three foes at the specific location. This weeks elimination challenge asks you to defeat a total of five enemies at Haunted Hills. Not exactly sure why the number was increased, but it still should be a relatively easy task. The mountain east of haunted also spawns a chest on the top, which can be another potential way of arming yourself before heading in. If you simply must head directly in, here are some of the locations of the chests located in Haunted Hills.
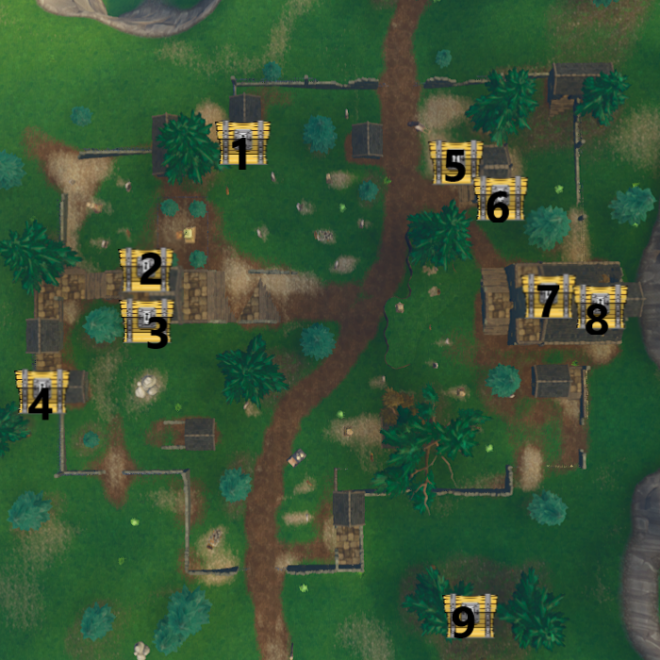
- Located in the far North left side, inside of a building filled with dirt.
- Inside of a fenced in area in the middle left side right behind a gravestone.
- Inside the middle most building on the left side. Two chests can spawn in this location on opposite ends of the wall from each other.
- This chest is hidden behind a wall. Listen for its unique sound, destroy the wall, and you’ll find the chest.
- Inside of the building directly north of the church. Go up the stairs into the building and around the corner to find the chest.
- Inside the same building as number 5, simply destroy the floor to find this chest. You could also go into the hole located in the northern part of the outside of the building to get to this chest quicker.
- Inside the church belltower.
- Under the church. There is a hole in the south-east side of the church that will immediately lead to this chest.
- On the back of a truck between two trees just outside the perimeter.
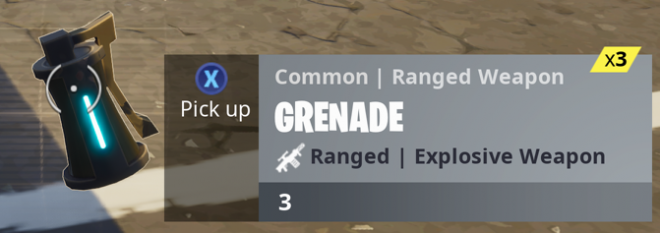
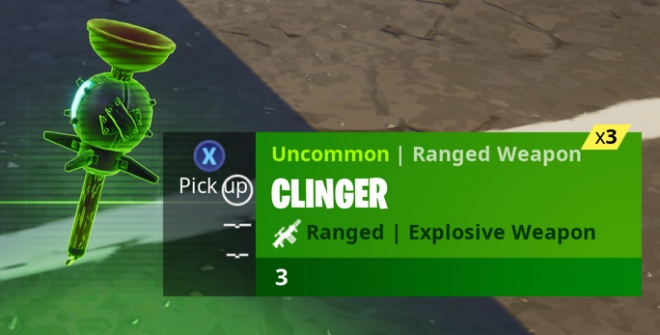
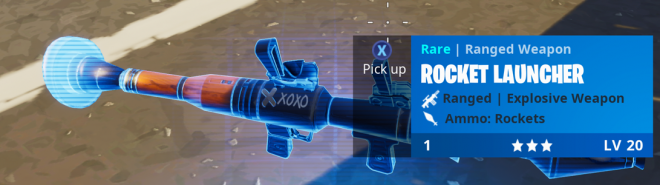
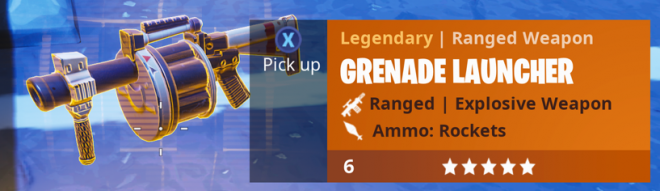
Explosive weapon eliminations
Grenades, Clingers (Sticky Grenades), Grenade launchers and rocket launchers can all be used to complete this challenge. Remote explosive does not count (for some strange reason). Obviously, the rocket launcher is the better choice given the large explosion radius and can lead to a more direct impact than the grenade launcher. The only problem is finding one. It’s more likely you will find a grenade launcher. These too can be useful for the challenge if used appropriately. Don’t just fire them randomly. Wait till an opponent is hiding in a fort and try to bank the grenades into the top of his fort. If you know an enemy is hiding in a building, fire them into the building, relative to where he may be standing. One of the best ways to utilize the grenade launcher is to fire it through windows of houses and buildings, the small confines will ricochet the grenade all around making banking a shot directly into your enemy even easier. After a recent update, weapon challenges will count for downing an opponent or by eliminating them using the weapon required. This makes the challenge even easier, as you can down an opponent in Duos, Squads, or 50v50, and then attach a sticky to them. If you down an opponent with any of the weapons provided, you MUST eliminate the opponent completely for the challenge to count. If the opponent is revived by a teammate, the down will not count. Below are the types of weapons you are looking for.
Secret Battle star location
Some may know exactly what this is, but many may not. After completing all seven challenges in a week, you’re awarded a loading screen. Wow, big reward right? A useless loading screen? All kidding aside, the loading screen normally hides either the symbol of the battle pass indicating where it may be in the world or a hint to its location. This week’s loading screen features the following image.
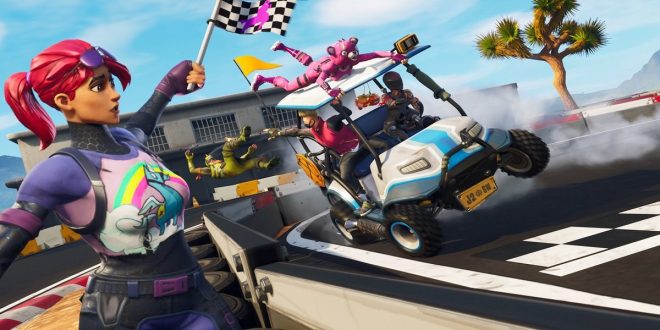
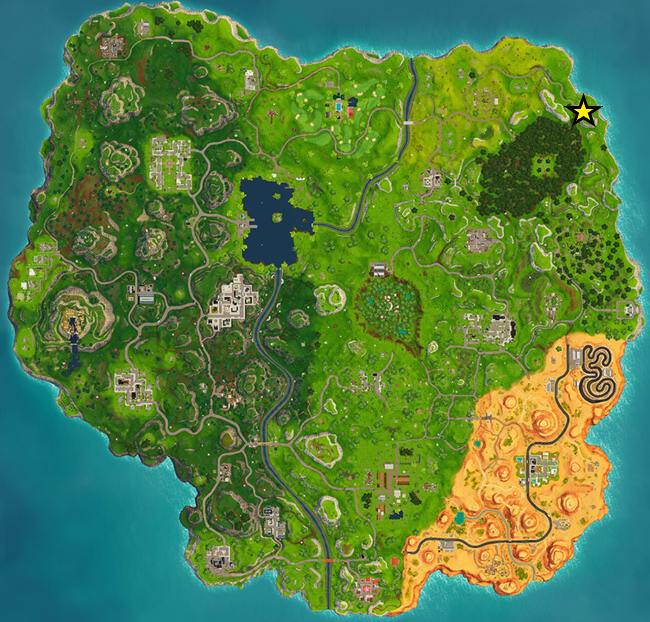
In this image, a hint to the battle stars location can be found by looking at the license plate of the all-terrain kart. The license plate reads, “J2 (Battle Star Symbol) SW.” Now looking at the map, we can see the graphical positions of A – J and the number positions of 1 – 9. Locating J2 on the map will lead you to the very top left corner of the map to a house that looks like it was built with a player’s materials. In a little dirt patch in some grass to the south of this house, you’ll find the secret battle star. Here is a map to help locate it.
Have you completed your challenges for weeks 1 and 2?
The Author